11.30.2010

Plaidly Pocket Quilt Finished!

I shared yesterday that I finished the plaid quilt I was working on!

It's marvelous!


Here are some of the finishing photos and the real unveiling!  When I last shared here, I was still in need of binding.

I decided on continuing the scrappy theme into the binding.  Also, remember that blue stars fabric?  It finally made it's appearance with some of the other fabrics I was working with for the top.

Yes, Katie continued her quality checks throughout the process.  Here you can see the quilt laid out with the loose binding cut out and laid on top.  Katie looks smitten, doesn't she?

I did have to cut a bit all the way around to square up the quilt.  Yes, it moved.  It always moves, doesn't it?  I have a neat idea on ways to use those small pieces of batting and fleece -- I'll have to show you soon!


This photo gives you a better look at the quilting pattern I went with.  And the binding is pinned and ready for sewing!


Sewing up the binding is always so nerve wrecking.  But, I didn't break any more needles and the binding went fairly smoothly!


Fast forward to the next morning and I was ready step back and take it all in!  So purdy!  I really like how the design turned out and that pocket totally rocks my socks!! 

Oh, and don't you like that little pop of royal blue from the binding?


Here is a close up of the flannel.  This is really one quilt that is meant to be touched before you can say you have really experienced it.  It feels so darn soft!!


A quick peak of the soft blue-gray fleece used for the backing.


This was certainly one photogenic and adorable lap quilt!  So, you may still be wondering who I made this quilt for.  I told you it was for a guy.  Any guesses?

The answer... this past Friday I gifted this quilt to my lovely step-father.  He is still healing and regaining strength from an operation last year and he mentioned that he is cold a lot -- especially this time of year.  That's what got my juices flowing.  Maybe a nice warm quilt to snuggle with would keep him warm like a nice big hug.

When I gave it to him, I kind of just plopped a folded up bundle into his arms and told him I made it for him.  He grinned, I grinned, Mom grinned, bro grinned, bro's fiancee grinned. 


Dad unfolded it and said it was really nice.  I told everyone they had to touch it -- it's so soft!!  Dad draped it on his lap and I think little tears were forming in the corner of my eyes. 


It's really touching to see him so surprised and happy!  That moment is what I focused on with each stitch I put into the fabric.  That is the moment I will remember for what I am sure will be a long long time!

I will also be sharing this at Amylouwho's Sew and Tell!  You can see other fabulous sewing projects finished this week here.

11.29.2010

One Thing, One Week

First a BIG Hello! to those of you who have been reading here for awhile now -- you have given me the drive and motivation to keep sharing my crazy happy passions here.  You make it so much fun!


Also, a Happy Hello! to those of you who are just joining and finding this happy little spot of the web.  I'm so glad you could make it and I look forward to getting to know you! 

And you know, speaking of motivation, lately I have been finding motivation all over my reading list.  This one in particular has pinched me to dive into and tackle my creative projects.  One Thing, One Week is hosted by Amy at Amy's Creative Side.  It's a simple challenge.  Proclaim that you will do one thing toward your creative goals and accomplish it in one week.  Simple, right?


I said here, "Motivation is good! My goal is to at least start a table runner and a few mug rugs for gifts!"

Challenge Results

Part I - Table Runner
In one week, I have dreamt up, designed, cut, pieced, quilted, and almost finished the binding on an amazing table runner for someone who shall not be named.

I just adore the girly fabrics I got to play with and coordinate for this particular runner. 

The quilting on this piece also went relatively smooth.  I am really becoming a believer in putting in a fresh needle to tackle quilting!


I'm sorry I can't share a totally finished project picture yet, as it might ruin the surprise for a certain someone who may unwrap a future giftie -- just saying.  After Christmas, this space is going to be jam packed with lots of finished projects to talk about!!

Part I of the challenge -- success!!


Part II - Mug Rugs

I said I wanted to start some mug rugs.  And I have to admit that other than some light designing I haven't really done that one yet. 

But.  there is always a but!

I did finish and gift the Plaidly Pocket Quilt I have been telling you about here, here, and here.

I really couldn't be prouder with how it turned out and the reaction it got!  I will do a full unveiling tomorrow!

If you would like to see other One Thing, One Week successes or sign up for the next one visit here.

Homemade Advent Calendar

We are entering that time of year where I have to keep a few things as surprises from you -- since certain lovelies read here often enough to catch things.  Like gifts I'm working.

Over the weekend I put together an advent calendar for Mr. Happy.  I can give you a bit about how I put it together, but as far as what goodies are behind the doors... we will all find out together, since even I don't know what hides behind each door.

I started with these supplies:
  • mini cupcake pan
  • a dozen of these pretty double sided gift tags (found on sale!)
  • wrapping paper
  • sharpie marker
  • tape
  • white glue
  • ribbon
  • candy and small toys
  • imagination
These are the double sided tags.  The square shape and size are the perfect size to cover the opening to a mini cupcake hole.  I used 12 of these cut in half to give me the 24 doors for the calendar. 

As a more personal touch I wrote little somethings on the inside of each door.  You could use seasonal jokes, words from seasonal songs, seasonal words, tiny tic-tac-toe boards, anything really. 

(use that imagination here)


This is the part where I have to skip showing a few steps as to not spoil the surprises...

I took the mini cupcake pan and stuffed all the little cubbies with mini chocolates and toys.  Honestly you can use anything here... as long as it fits in the mini spot.

Then I used jolly wrapping paper to cover the whole pan (the treats are already in the pan -- and yes that is my assistants paw in the picture!).


I then made an X cut with a small pair of scissors across the opening of each of the little cups to make it easier to get the treat out once you open the door. (not pictured; since the treats peak out a little then)
Next step is to feel around for the cup opening and do your best to center the tags over the opening.  I attached the doors with a clear piece of tape on the left for the door hinge and a small drop or two of glue to hold the door shut.  This also prevents someone from opening a door before the date.

I went with a fun random pattern of tags.  Once the doors were on I used the sharpie marker to put the numbers 1-24 randomly on a door.  Now you can really see how I have no idea what treat ended up behind each door. 


I used ribbon to make a bow which doubled as a hanger -- since this went on the wall right outside the kitchen.


Here it is all ready to for December to roll around!


I'm not sure who's more excited about starting to open doors -- me or Mr. Happy. 

11.28.2010

Three Turkey Dinners

Oh, what a great weekend!!  The time with family, the three turkey dinners, the cooking, the football, the sewing time, the doggy time.  I enjoyed myself so very much and hope you did too!! 

We'll be getting back to regular blogging here now -- I have lots of fun things to show you this week!!

11.24.2010

Project Journal

As we are nearing Thanksgiving, our sewing and crafting time may be running short as our family time increases.  My remedy for that is my new project journal. 

I have found myself lately inspired to the brim with ideas and things I'd like to try.  I may be driving home all the while plotting out a project or sometimes when I am cooking dinner I can see a new quilt pattern in my head.  But, when I finally make it to sit down at my sewing table I can't think of those creative morsels... at all.

The remedy:  A colorful hard covered journal that I can fill up with everything!  And it's small enough to tuck into my purse so I can take it with me everywhere.  (this one is from Barnes and Noble)


Just look how pretty it is.  The colors, the design, the shininess!!  sigh, it's wonderful!


It's also wonderful to know that my ideas will be safe and sound from my lousy memory.  I am also finding that as I plan out an idea and then later come back to it... I am enhancing it with extra details. 

Win-win!


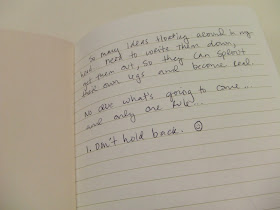
With my journals I typically write something to myself like I did on the first page of this one.  And yes, I gave myself only one rule here.... "Don't hold back." 

As in, there are no bad ideas only bad memories!


Some of my early doodles:  for me it's more important to be able to scribble down an idea quickly rather than capturing it with a perfect sketch and lots of text.  These quickies are enough to jog my memory for the rest of what I was thinking.

- A wood carrying sling made from bright blue canvas
- light jars; which my loving husband has informed me may get too hot and therefore cause bad things unless I maybe do this with LED light strings  sigh
- decorated branches in vases to flank the mantel

- possible designs for christmas lights on our front stairs and door.
- recycle plastic bags into bows/pom poms to add to the railing.


And the ideas go on and on!!

I am enjoying the peace of mind knowing my ideas are safe and I am enjoying seeing them come to life too!  I am sure you will see more of the journal in the future!! 

How do you keep your ideas or inspirations safe?

11.23.2010

Plaidly Update and Fabric Loving


I am making some serious progress on the Plaidly Pocket Quilt!  The quilting is nearly done, I am moving to quilt the outer most row tonight.  I'm not looking forward to binding, but will muster the nerve to get on it!  If you know of a binding tutorial... could you be a doll and leave it for me in the comments or email me with it?  Purdy please?

I have done a lot of pinning and re-pinning over the last few days.  Pinning and I aren't BFF.


This quilt has also been interesting since I broke one needle and bent two others in a matter of a few hours.  After the first one, I was thinking ohhhh this happens.  After the second one, I was thinking I am so doing something wrong.  The third made me look everything over and I think I nipped it.


I couldn't be happier with how the quilting is coming out overall.  The quilting I decided on is adding to the plaid square look nicely and I enjoy holding this quilt so much -- its so darn soft!!  It has been pure joy putting this together and I just can't wait to see it to it's new home shortly!


I have also taken out a bunch of other fabrics to be put on the chopping block (cutting block?).  Once I start getting into these sewing grooves I get pretty obsessed with making things and just gotta keep rolling.  Hurt me, right?


Can you see what these will become?  It's funny... I can look at fabric stacks like these and already start to see in my head what they will be.  I know... it's some sort of sickness isn't it.  Either way.. I love it and wouldn't have it any other way!


I was also recently inspired by Miranda at Miranda and Charlie (who I met through Stash Manicure) to do something with my scraps (who were sadly stuffed in a box and mostly unseen for a year).  Here is what Miranda did.  She took her scraps and put them in a pretty glass jar.  So simple, so genius!!  Such a cool way to be able to see all the scraps together for inspiration!!  Below are pictures of Miranda's scrappy jar.


Here is my attempt at putting together a scrappy jar. 

I took a vase that wasn't being used and stuffed the 'ole scraps in the there (they're free of that boring dark box)! 

It really is fun to reach in and grab a scrap and remember what else that fabric was included in.  It's also helpful to see all the scraps mixed together like this.  As, I spin the vase I can start to visualize different things I want to try!

And yes, that is pirate skull and cross bones ribbon.  It's ok to have ribbon in my scrappy jar -- after all ribbon needs love too!


I'm feeling so full of ideas today and am being sure to jot them all down.  Can't wait to get back to my sewing machine!

Creative Tuesday: Heavenly

Happy Tuesday Lovelies!! 

It felt so good to pick up my pad and pen to put together a little something for this week's Mr. Toast's Creative Tuesday's assignment!  The theme this week was Heaven or Heaven-ly!

For me, a heavenly way to spend my time is hiking with my family.  The Mr. and I had a hiking first date even and we still will use any excuse to run out into the woods for bit. 


I used pen and color pencils for this simple sketch and I scanned in the finished drawing -- really makes for a nice electronic capture!  It also saves me this time of year when I don't have a lot of time with good photo light.

Hope you're feeling the creative juices flowing today!  You can check out the other artists here.

11.22.2010

Origami Pine Tree Tutorial

Want to extend a happy hello and thanks for coming over from Craftgawker!! 
 ------** ---------------------------------------------------- ** ------

Let me show you how you can take a few square pieces of paper and turn them into your very own forest like this!

You can also make cute little trees for small figures like this iguana!  He looks right at home, doesn't he?


Here's how you do it...

Step one.  Start with a square piece of paper (I used pre-cut origami paper).  Printer paper has about the right thickness, but you could also use wrapping, news, or magazine paper (left).

Step two.  With the pretty side of the paper up (the part that you want your tree to look like) fold the paper diagonally pulling one corner up to the opposite corner (right).


Step three.  Open the previous fold you just did.  See, you can do this!!  Origami totally rocks!


Step four.  Yup, you guessed it... now turn the paper 90 degrees and fold the other corner to the opposite corner (left).

Step five.  And yes, open it back up.  You should now see an X made from the two folds you just did (right).


Step six.  Flip the paper over, so that the pretty side is now facing down (left).

Step seven.  Take the bottom flat edge and fold it up to the opposite top flat edge.  This will give you a horizontal fold in the square (right).


Step eight.  Open up the fold you just did and you should see a line running across the paper from left to right (left).

Step nine.  Fold the other flat edge to the opposite flat edge and then open up your fold again (right).  Your paper will now have lines horizontally, vertically, and on both diagonals (not pictured)!

Step ten.  Flip your piece of paper back over so that the pretty side faces up.  In this step, you are looking for the square that was made from the folding outlines.  See how the folds sectioned the paper into fourths below?


Step eleven.  Here you want to pull the paper in behind that square we found in the last step.  See how part of the paper gets tucked in behind the square. 

You'll know you have it right when you now are holding a square 1/4 the size of the original piece of paper with the pretty side facing the outside all around.  Phew!  If you are still with me, then you are half way to you tree!


Step twelve.  Put the 1/4 size square flat on your working surface and pull up one of the arms (origami tree's have arms!).  Then open the pocket and it will look like the picture below on the left.  Arm up... pocket open.  Good so far?

Step thirteen.  Ok, we are in the arm up... pocket open position... next step is to push down on the top of the pocket until the pocket is laying flat and press the new folds really well (right)

REPEAT Step thirteen on the remaining three arms.  No arm left behind!


Step fourteen.  With all the arms pressed down your square will now look like the picture below on the left.  In this step, we take one of the folds and flip it over to the right or left like a book page.  This step aims to make sure only the pretty sides are showing all the way around.

REPEAT Step fourteen on the reverse side.  You should only see the pretty side now all the way around (right).

Step fifteen.  Now we work with the feet (yes, origami trees have feet!).  Take the bottom flap or foot and fold it up so that the point lines up with the center fold.  It should be folded up far enough so that the fold lines up to make the top section look like a nice tree shaped triangle (left and right).

REPEAT Step fifteen on the other three sides.  In order to do this, you have to turn the book pages (pictured on the left below).  When you are done your paper will look like the picture on the right below (left and right).

Step sixteen.  Make sure you crease the bottom of the triangle really well again by pressing on the folds with your finger (left).  Then lift up the part that you just folded up (right).

Step seventeen.  The lifted part now gets tucked all the way down and under (left).
REPEAT Step seventeen on the other three flaps.

When you are done your paper will look like a flattened tree (right).


Step eighteen.  Plant your tree!!  (a.k.a. stand it up) You may need to separate and re-crease those arms so that they have even spacing.  So, that wasn't so bad, right?


Ta da!!  Origami makes a great project for kids too as it teaches them patience, hand eye coordination, how to follow instructions and leaves them with a quick sense of accomplishment!!


Now, how cute would these be with a little pom-pom glued on top or sequins and buttons attached as ornaments.. or a whole forest made up of different sizes for a table scape with a few pine cones?  I even think you could use a razor or scissors to slit the top and stick a name card in them for a place setting!!

Hope you have fun with this!!  Remember, if you didn't like a fold or made a wrong move, you can always unfold and fold again.  After all .... it's only paper!!

Let me know if you would like to see more tutorials like this and what things you'd like to make!  I think it would be fun to do a few more of these, don't you?

Calm your mind and open your heart!