Showing posts with label pocket. Show all posts

11.30.2011

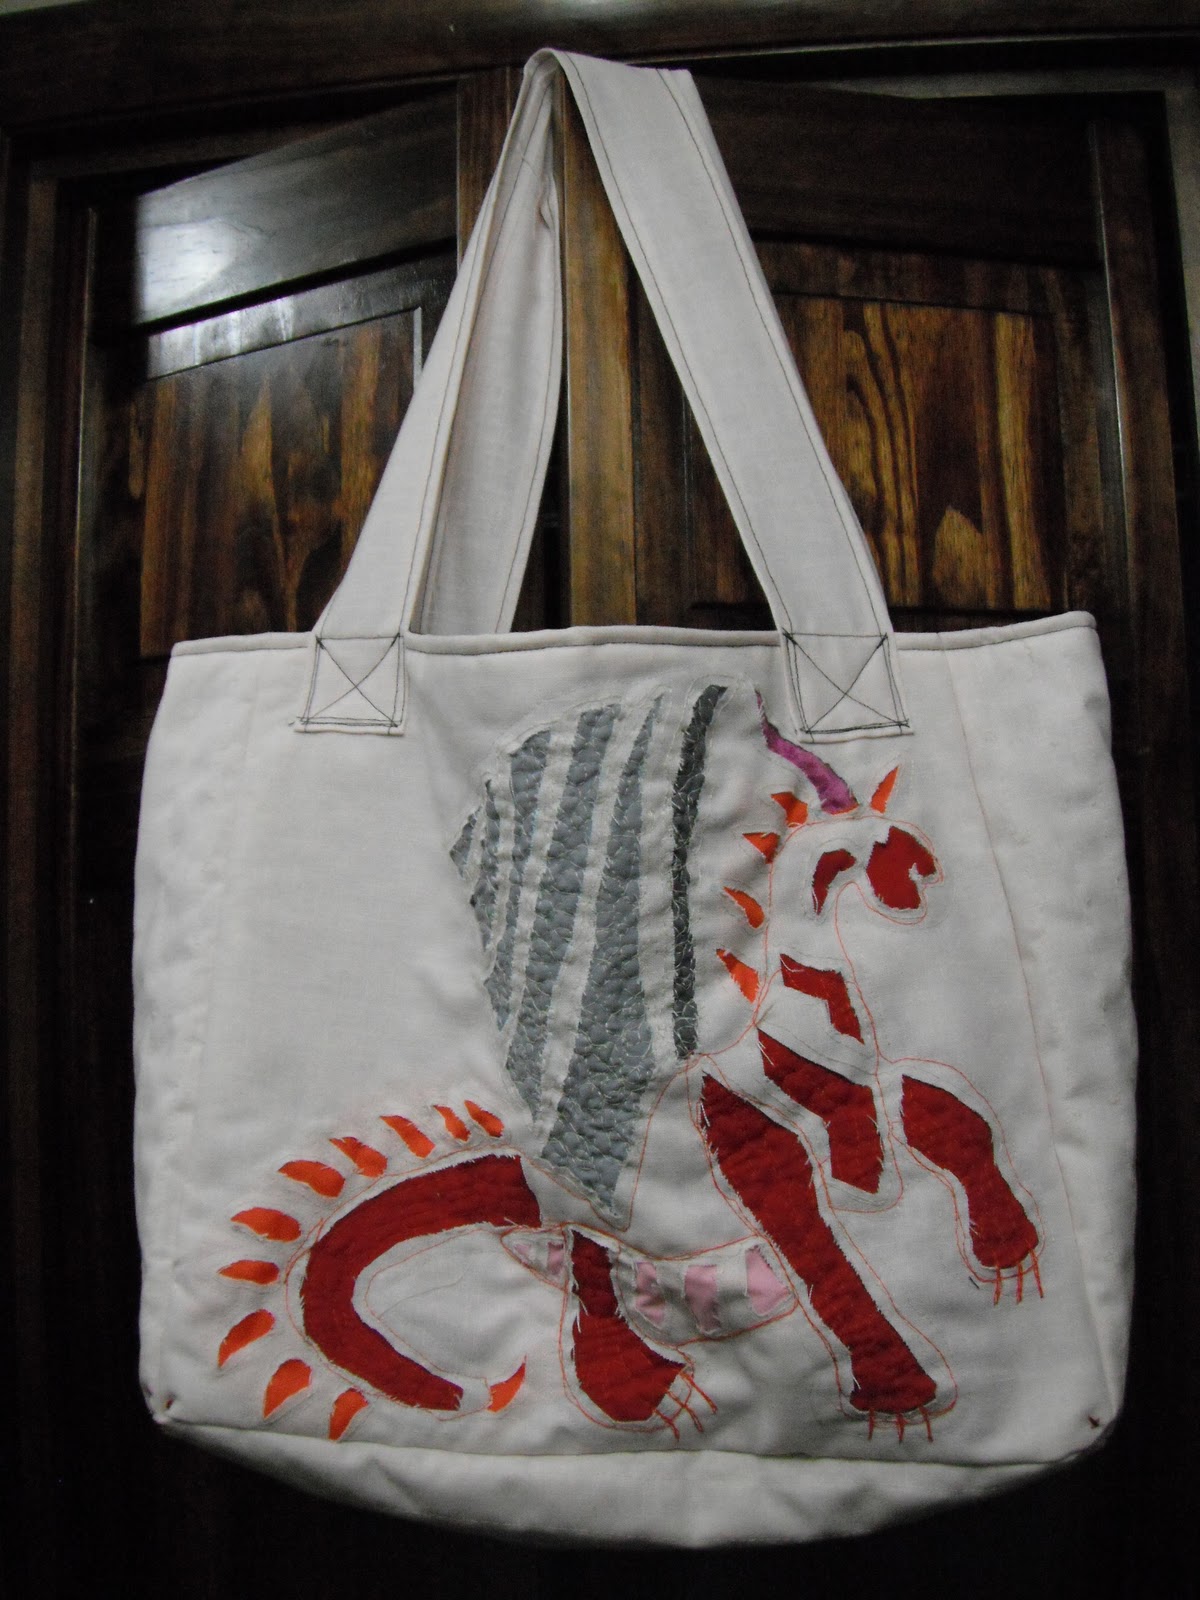
Dragon Tote is Solidly Done!

I have finished my Solids Only Tote (with only hours to spare!).  I'm going to post a few quick pictures tonight and will be back tomorrow with a few more words and details!!


And, oh, how good being done feels!!


You can read about the challenge by clicking on the button and see the other entries here!

1.25.2011

Be My Valentine - Heart & Joke Origami Tutorial

Valentine's Day is the perfect excuse to whip up a little origami project to say I love you!

We will be making a cute little heart (with a pocket and flap) that you can write a joke on or tuck a love note or candy into!! 


They would also make excellent party name cards, surprises in someones purse, briefcase, or lunch box... or how about putting one in your Love's coat pocket, car, or winter hat? 

Let's give it a try! 

Step one.  Start with a square piece of paper -- pretty side up.  I used a 6 x 6 inch in the demo and the heart shrank to about 3 inches tall; which was a perfect hand size for me. 


Step two and three.  Take the bottom left hand corner and bring it up to the upper right hand corner to make a diagonal fold (left pic).  Next take the bottom right hand corner and bring it to the upper left hand corner (right pic).

Step four. Unfold the square you will notice you have two diagonal lines making a big X on your paper!


Step five and six.  Fold the bottom edge up to the top (left pic).  Then fold the left edge over to the right edge (right pic).

Step seven.  Unfold the square and you will be left with the original paper with lines across, and up and down.


Step six.  Flip your piece of paper back over so that the pretty side faces down.  In this step, you are looking for the square that was made from the folding outlines.  See how the folds sectioned the paper into fourths below.


Step seven.  Here you want to pull the paper in behind that square we found in the last step.  See how part of the paper gets tucked in behind the square. 

You'll know you have it right when you now are holding a square 1/4 the size of the original piece of paper with the pretty side tucked inside the square.  (Yes, I switched my demo origami paper in between steps, ha!)


Step eight.  Turn your square so that the open flap part is now at the top of the square.  Lika so...


Step nine and ten.  Take one of the arms from the top and fold it down to the bottom point (left pic) -- which should now also show off that amazing color in the middle! Now, flip the square over and repeat the same thing here... pull the arm down to the bottom point (right pic).
Step eleven.  At the new top now you can see there is a split between what could be two antennae; grab the left antennae (left pic) and pull it down past the half way a bit and on an angle to form the top bump of the heart.  Yes, it's ok to be artsy here... many angles will work and you just want to make sure you pull enough down that you can tuck the antennae into the pocket in the middle.

Step twelve.  When you get you top bump looking like you like it... then press to create a fold and tuck that little flap in.

REPEAT Step thirteen to create the right bump. 


Step fourteen.  a.k.a - the easiest step.  Admire the artistic folding job you have done so far and flip the heart over. (pic shows the 'backside' of the heart with the flaps tucked in)

Step fifteen.  a.k.a. - the other easiest step!  Check out the pocket (left pic) and heart flap (right pic).


Step sixteen.  Proceed to play!!!  Here are some of the things you can do with your new Valentine or any lovey-time heart...

1. Put goodies in the pocket!!

I have to admit not a lot fits in the pocket, but part of the fun is trying different things! 

In this one, I wrote a name on the front and then tucked a joke in the pocket. 

NOTE: When writing on the front, using permanent maker, expect bleed through!  I put a folded piece of scrap paper in the flap while I wrote on the front to prevent this.


For the joke I found this free printable Disney joke sheet which was easy to print and cut apart!

Funny, funny stuff!!


I also wrote a cute little something under the flap...  reminder... Katie is my sweet almost four year old golden retriever "puppy!!"


2. Write a joke right on the front of the heart with the answer hidden in the flap!!

Q: "What do squirrels give for Valentine's Day?"


Q: "What did the caveman give his wife for Valentine's Day?"


Here are some other jokes I found in a quick search... 

go ahead...

laughing at corny jokes is good wholesome happiness!

Q: What did the stamp say to the envelope?
A: I'm stuck on you.

Q: What happens when you fall in love with a French chef?
A: You get buttered up.

Q: What is a vampire's sweetheart called?
A: His ghoul-friend.

Q: What do farmers give their wives on Valentine's Day?
A: Hogs and kisses!

3. And why stop there when you can use sappy Knock Knock jokes!!

You're going to love this one!! 


Get it?  Hahahahaha!! 

Yes, I have had a ton of fun making these up!

--------------------And, Mr. Happy this one's for you love!----------------------

Q: "What did one light bulb say to the other?"


Hope you enjoyed making your own origami hearts as much as I did!!  

Perhaps you would to try another origami?
Origami Pine Trees

11.30.2010

Plaidly Pocket Quilt Finished!

I shared yesterday that I finished the plaid quilt I was working on!

It's marvelous!


Here are some of the finishing photos and the real unveiling!  When I last shared here, I was still in need of binding.

I decided on continuing the scrappy theme into the binding.  Also, remember that blue stars fabric?  It finally made it's appearance with some of the other fabrics I was working with for the top.

Yes, Katie continued her quality checks throughout the process.  Here you can see the quilt laid out with the loose binding cut out and laid on top.  Katie looks smitten, doesn't she?

I did have to cut a bit all the way around to square up the quilt.  Yes, it moved.  It always moves, doesn't it?  I have a neat idea on ways to use those small pieces of batting and fleece -- I'll have to show you soon!


This photo gives you a better look at the quilting pattern I went with.  And the binding is pinned and ready for sewing!


Sewing up the binding is always so nerve wrecking.  But, I didn't break any more needles and the binding went fairly smoothly!


Fast forward to the next morning and I was ready step back and take it all in!  So purdy!  I really like how the design turned out and that pocket totally rocks my socks!! 

Oh, and don't you like that little pop of royal blue from the binding?


Here is a close up of the flannel.  This is really one quilt that is meant to be touched before you can say you have really experienced it.  It feels so darn soft!!


A quick peak of the soft blue-gray fleece used for the backing.


This was certainly one photogenic and adorable lap quilt!  So, you may still be wondering who I made this quilt for.  I told you it was for a guy.  Any guesses?

The answer... this past Friday I gifted this quilt to my lovely step-father.  He is still healing and regaining strength from an operation last year and he mentioned that he is cold a lot -- especially this time of year.  That's what got my juices flowing.  Maybe a nice warm quilt to snuggle with would keep him warm like a nice big hug.

When I gave it to him, I kind of just plopped a folded up bundle into his arms and told him I made it for him.  He grinned, I grinned, Mom grinned, bro grinned, bro's fiancee grinned. 


Dad unfolded it and said it was really nice.  I told everyone they had to touch it -- it's so soft!!  Dad draped it on his lap and I think little tears were forming in the corner of my eyes. 


It's really touching to see him so surprised and happy!  That moment is what I focused on with each stitch I put into the fabric.  That is the moment I will remember for what I am sure will be a long long time!

I will also be sharing this at Amylouwho's Sew and Tell!  You can see other fabulous sewing projects finished this week here.
11.23.2010

Plaidly Update and Fabric Loving


I am making some serious progress on the Plaidly Pocket Quilt!  The quilting is nearly done, I am moving to quilt the outer most row tonight.  I'm not looking forward to binding, but will muster the nerve to get on it!  If you know of a binding tutorial... could you be a doll and leave it for me in the comments or email me with it?  Purdy please?

I have done a lot of pinning and re-pinning over the last few days.  Pinning and I aren't BFF.


This quilt has also been interesting since I broke one needle and bent two others in a matter of a few hours.  After the first one, I was thinking ohhhh this happens.  After the second one, I was thinking I am so doing something wrong.  The third made me look everything over and I think I nipped it.


I couldn't be happier with how the quilting is coming out overall.  The quilting I decided on is adding to the plaid square look nicely and I enjoy holding this quilt so much -- its so darn soft!!  It has been pure joy putting this together and I just can't wait to see it to it's new home shortly!


I have also taken out a bunch of other fabrics to be put on the chopping block (cutting block?).  Once I start getting into these sewing grooves I get pretty obsessed with making things and just gotta keep rolling.  Hurt me, right?


Can you see what these will become?  It's funny... I can look at fabric stacks like these and already start to see in my head what they will be.  I know... it's some sort of sickness isn't it.  Either way.. I love it and wouldn't have it any other way!


I was also recently inspired by Miranda at Miranda and Charlie (who I met through Stash Manicure) to do something with my scraps (who were sadly stuffed in a box and mostly unseen for a year).  Here is what Miranda did.  She took her scraps and put them in a pretty glass jar.  So simple, so genius!!  Such a cool way to be able to see all the scraps together for inspiration!!  Below are pictures of Miranda's scrappy jar.


Here is my attempt at putting together a scrappy jar. 

I took a vase that wasn't being used and stuffed the 'ole scraps in the there (they're free of that boring dark box)! 

It really is fun to reach in and grab a scrap and remember what else that fabric was included in.  It's also helpful to see all the scraps mixed together like this.  As, I spin the vase I can start to visualize different things I want to try!

And yes, that is pirate skull and cross bones ribbon.  It's ok to have ribbon in my scrappy jar -- after all ribbon needs love too!


I'm feeling so full of ideas today and am being sure to jot them all down.  Can't wait to get back to my sewing machine!
Related Posts with Thumbnails