Showing posts with label confetti. Show all posts

3.14.2012

Wednesday WIP: This Sewing Factory is Crankin'

I have managed a bit of very focused sewing which is allowing me to reach my goal of finishing a ton of things by the weekend for a swap and to enter two shows.  I wasn't really sure I'd be able to get it all done, but it's happening!!
 
--FINISHED--  Name Game Swap
Finished this mini quilt up and popped it in the mail.  My secret swap partner should be getting it today or tomorrow!  Below is a little sneaky peak.  I'll show the whole thing once it reaches it's new home!


--GETTING BINDING--  {At Sunrise}: Confetti Quilt
My confetti style quilt which you can see the making of here, is ready for binding.  In fact, I did pick out and attach the binding to the front (not pictured).  So, all I have to do is hand sew the binding to the back, make a hanging sleeve and label... and this one is D-U-N!

And yes.... seriously, this is hands down one of my favorite pieces!  It's a scene which I have had in my head for a long time and I'm glad it's finally down in fiber!


--IN PROGRESS--  {The Lake}: Landscape Quilt
You might remember that I started this art quilt in a guild class recently and I am determined to finish it in time for the next guild meeting (next Tuesday)... and that also means that I could still enter it in my upcoming work art show. 

I spent time last night cutting out the rest of the template pieces, cutting mountain and sky fabrics, and sticking them together.  The hardest part of this freezer paper technique is that you can't see the work progress because it's, well, covered with freezer paper.  I'm going to leave you with this teasing picture of it. 

If you're wondering... I did pull the freezer paper off the whole thing last night and I adore it so far.  I also gave it a backing, basted it, and started to quilt it.  Feels like my little sewing 'factory' is really humming along nicely!! 


--ON PAUSE-- 

Laughing Leaves with Frieda Anderson
More of the project can be seen here.  I am really darn tempted to try and finish up this piece over the weekend as well.  I know.. I know.. call me crazy, but this would give me a final piece to enter in my work art show!

Spinning Starlets {English Paper Piecing} -- a.k.a. I've reached a new level of crazy!
I will pick this up again once my quilt show pieces are d-o-n-e; only 6 weeks to go!  Following along with the Block Party at Selfsewn; creating Rose Stars.  You can read about my overall experience with English Paper Piecing!

Still no deadline for this one.  The way things are going, maybe I pick this up once my show pieces are done?

WIP Wednesday at Freshly Pieced

This Week's Work in Progress (WiP) Stats:
Last WiP Wednesday Total: 6
New Projects: 0
Finished Projects: 1 (Name Game Swap mini)
Total WiP's: 5

3.12.2012

The Beginning of "At Sunrise"

Does your sewing area ever look like this?  Come on, be honest with yourself!


Ya, mine too.  Sometimes I am going so fast and creating a ton of things at once that I skip the cleaning part of quilt making all together.  Actually, I'm not really sure cleaning is really a step anyway.

Here is my cleaning remedy...  confetti quilting.

Grab a handy piece of fabric that you might not find yourself using in your quilting any time soon.  This is also a good way to use up fabrics that were doomed for the trash.

Cut a piece of left over batting about the same size as the backing fabric and place it on top.

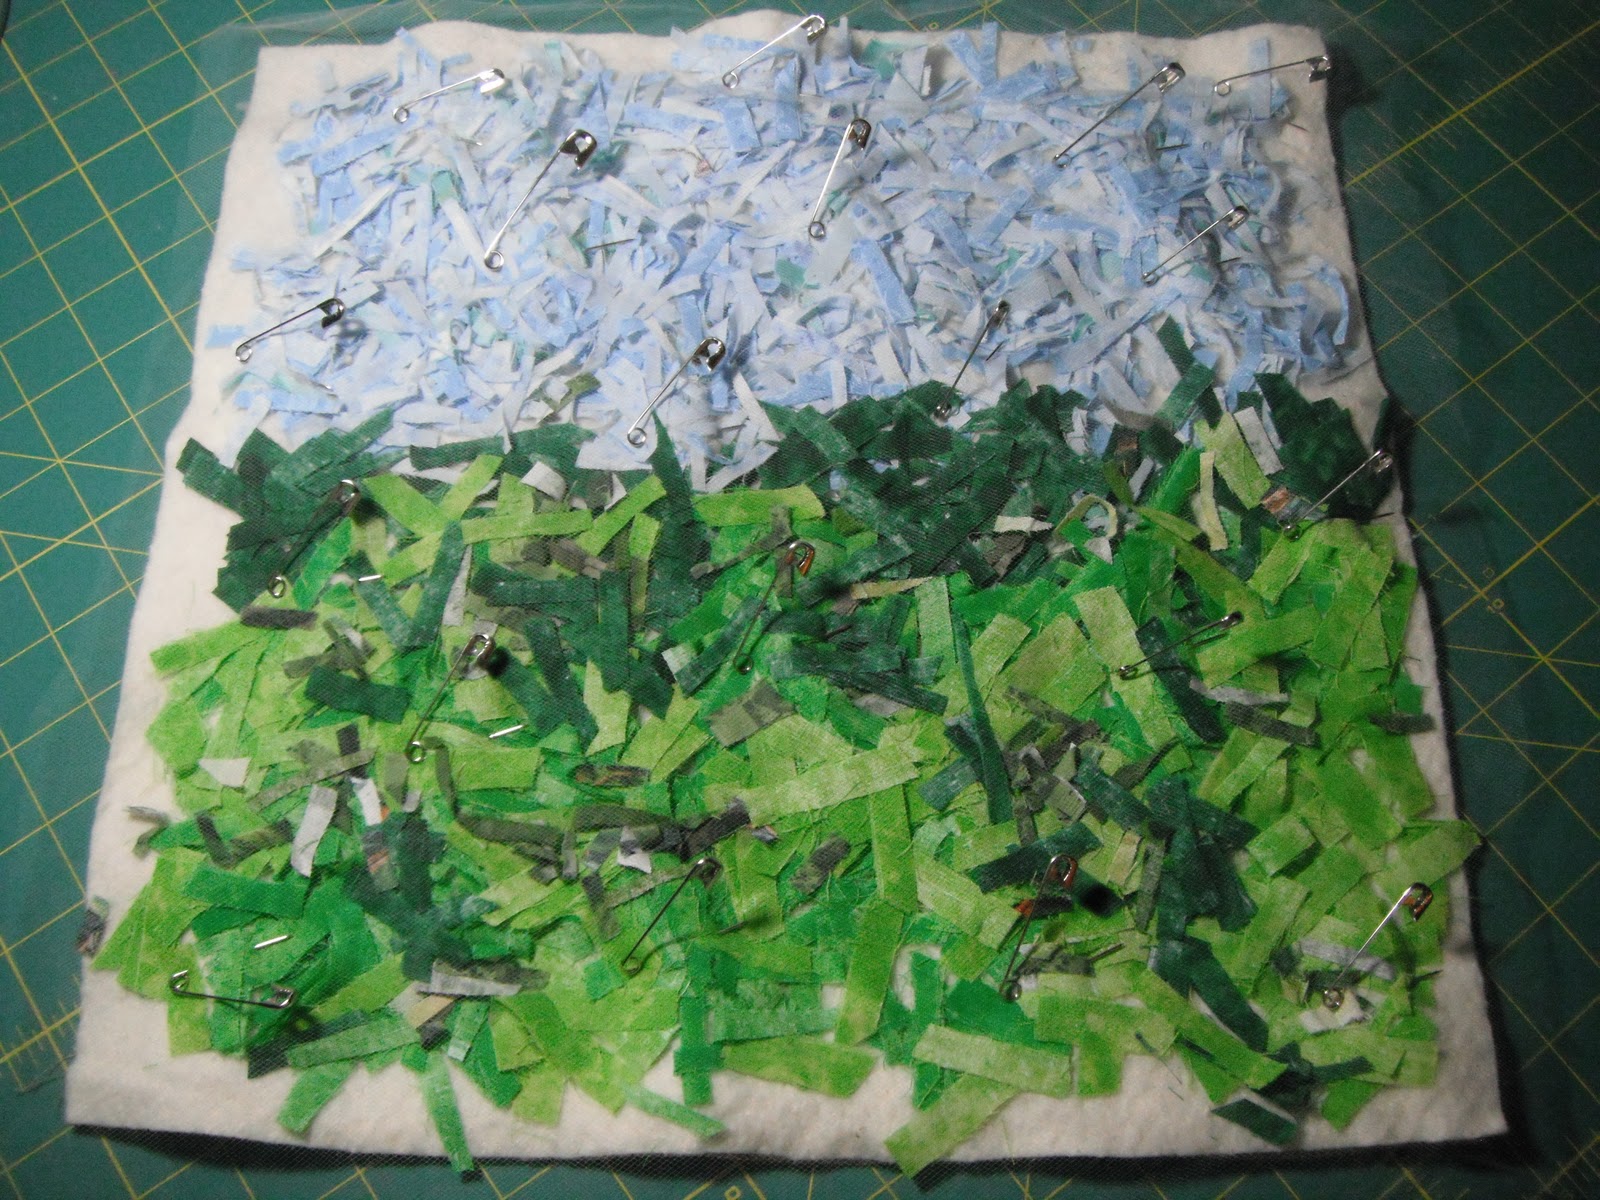
Now start to layer up those small bits, pieces, threads, batting and lace that are taking over your sewing station (anything that you can sew through can be put down at this stage)

When I do get the urge to clean I take the time to separate my scraps... my large ones get folded and put in a drawer, my medium pieces are put in jars by color, and the tiniest bits get tucked into this fishing tackle container until it starts to overflow like this.

Using your rotary cutter or scissors cut the fabrics by color into toothpick sized bits.  This makes up the confetti that you will 'paint' with for your confetti quilt.

Here I am applying my confetti bits.  It's very scientific (har, har!).. I take a large handful of red... and toss, toss, scatter.  Repeat with the next color.  Really it's very freeing!

Keep adding and layering.  Remember to mix colors and textures.  Prints and solids can be used and the idea is to cover up every spot of batting although I do leave about an inch and 1/2 edge all the way around the piece.

I also found that a little hand mixing or spreading once the confetti was down helps 'smudge' the colors together.  Don't be shy to get your hands in there.

Once you have the colors you want, lay a large piece of tulle over the top and pin it down -- I use large quilting safety pins, but don't pin them shut so they are easier to remove as I'm quilting.  Next, I sewed the larger piece all the way around the outside (to secure the tulle) and then into smaller quadrants to hold the confetti approximately in place. 


The smaller quadrants also allowed me to adjust confetti pieces later as needed. 

And now you work to secure all the confetti pieces with free motion quilting.  I did wavy and swirly lines back and forth to create the sky texture and clouds from the sunrise picture I was working from.  I used pink, red, orange, yellow, blue, and purple threads to add to the overall feel.

Now that I had the background to my liking it was time for me to add the trees!  I cut out strips of black fabric... in this case an old collared work shirt my husband was ready to toss... and started to arrange them.

In this step, I also added a second layer of batting and backing... as an experiment mostly.  The background was getting a bit flat from all the quilting and I wanted the trees to take on more dimension.  It has made the quilting a bit more tricky, but I like the resulting texture.  Definitely something I can see playing around with again.


I pinned things in place once I had them to my liking.

This is the view from my window which shows the same trees I am trying to create in this piece, just from a slightly different angle.  Fun to think I am capturing them in this way!  And really fun to study how branches connect and overlap.

Yup, you guessed it.  More free motion to secure the trees.  I also found that using my walking foot worked well on the longer pieces. 

I also tried to run both black and dark brown thread through my needle.  And it did work, but I think it would work better with thread colors from the same brand.  The brown kept breaking (driving me nuts) and I decided to just use the black to keep me from pulling all my hair out. 

My last note here is that I also ended up changing my needle from a 14 to a 16... I think the extra thickness from the double batting was better dealt with by a needle meant for tougher sewing.  How did I know to change needles?  Well... I snapped the 14 after just a few inches... so that clued me in to try something else.

Here is a look at all the main trees quilted into place in a ray of sunshine pouring onto my desk.  And what glorious sunshine we had this weekend!


At this point I cut off the extra edge and the tulle that had been hanging off the edge (and getting caught in my sewing machine).  Funny how such a small thing as cutting closer to the final edge made this piece mature very fast!


And what would trees be without the hundreds of branches and limbs going this way and that?  I went back to free motion quilting and without marking set out create branches. 

I have really enjoyed this part!!  After a few more hours I managed to add branches to every tree.  And this also means that I completed my One Thing, One Week Challenge goal that I set for myself over at Amy's Creative Side.


Late last night I was trying to determine if it needed any other branches.  Of course the longer you stare at something the more you stop seeing it.  So, I decided it was a good point to walk away.  I am looking forward to getting back to this later in the day and deciding if it's in need of anything or done. 

Last step will be a pressing and binding.  And goodness me... I've no clue what color to bind with.  Hoping that idea comes to me soon -- or if you have any thoughts.. do share!!

I appologize for the extra long post, but it feels really nice to document this piece... I have a feeling it's going straight to the top of my favorites list. 

What did you work on this weekend?  And I will share the second half of our maple sugaring adventures tomorrow!

2.29.2012

Wednesday Work in Progress: Leap Day!

I didn't get a ton of sewing done, but I did enjoy some time here and there working on my projects.  And I also took a landscrape quilt class!

--NEW--

{The Lake}: Landscape Quilt
I took a class through my quilting guild this past weekend with an amazing instructor (Tamar Drucker) and learned the finer points of putting together a realistic landscape quilt.  Surprisingly, the realism part of this was a struggle for me.  I am learning that I am more comfortable in the abstract realm... but man 'o man is it cool when you can look at a quilt and really recognize the person or place.  Once I focused on being exact and fussy over my shapes and placement I really started to enjoy the process!

We started with our own picture; you may reconize this as the lake near my house.  We learned how to enlarge it, section off the quilt in to various parts, and then create templates to make each piece. 


With my handy box of scraps and an open mind I set off to creating my lake in fabrics and had a blast!  I got about half way through in the class and really look forward to picking this project up again this weekend!  And with a bit more practice under my belt I think I will be ready to try making an art quilt of the dogs... won't that be something!


--IN PROGRESS--

Name Game Swap - due March 15th
No progress on this one last week, but I need to get moving on it!

{At Sunrise}: Confetti Quilt
My newish confetti style quilt of the sunrise I see during the winter from my sewing table is coming along nicely!  I have all the little scraps cut and in place.  I covered the whole thing with tulle, and started quilting it to hold those pieces in place.

This is the biggest confetti quilt I have made to date, so I had to come up with a way to creating sections or squares as a way to stabilize areas so I could maneuver the quilt without having to worry about all the pieces moving.  And guess what?  It worked really well!


I just love the texture of these quilts once I lay on a bunch of thread!  They feel bumpy, ridgy, rough, lumpy -- sounds funny, but it's a real treat under your fingers.  I have used red, pink, yellow, orange, blue, and purple thread so far in addition to the cream that I used to stabilize everything.

I am nearly ready to call the background complete and begin on the detail of the trees.  I find this process so rewarding and relaxing and am enjoying each stitch!!  This is one of those pieces that has been a true joy to create!


--ON PAUSE-- 

Spinning Starlets {English Paper Piecing} -- a.k.a. I've reached a new level of crazy!
I will pick this up again once my quilt show pieces are d-o-n-e; only 6 weeks to go!  Following along with the Block Party at Selfsewn; creating Rose Stars.  You can read about my overall experience with English Paper Piecing!

Laughing Leaves with Frieda Anderson
More of the project can be seen here.  Can't wait to roll up my sleeves and dig back in!  You can also check out what I learned about using fusible in an art quilt!
Still no deadline for this one.  The way things are going, maybe I pick this up once my show pieces are done?

WIP Wednesday at Freshly Pieced

This Week's Work in Progress (WiP) Stats:
Last WiP Wednesday Total: 5
New Projects: 1 (lake landscape quilt)
Finished Projects: 0
Total WiP's: 6
 

2.22.2012

Wednesday WIP {Sunrise is Born!}

Wowie, what a crazy amount of sewing lately.  I have about six more weeks of frantic sewing until I am done with everything for the two shows I have coming up.  And then I can breath.
 
--FINISHES--
 
{This Dance}: Forms of a Dress Challenge - finished and turned in at the guild meeting last night!  When I see her next it will be at my first real quilt show!!
 
 
Private Swap with Megan from Silver Threads of Happiness - done and officially in the mail!!  And still totally top secret!
 
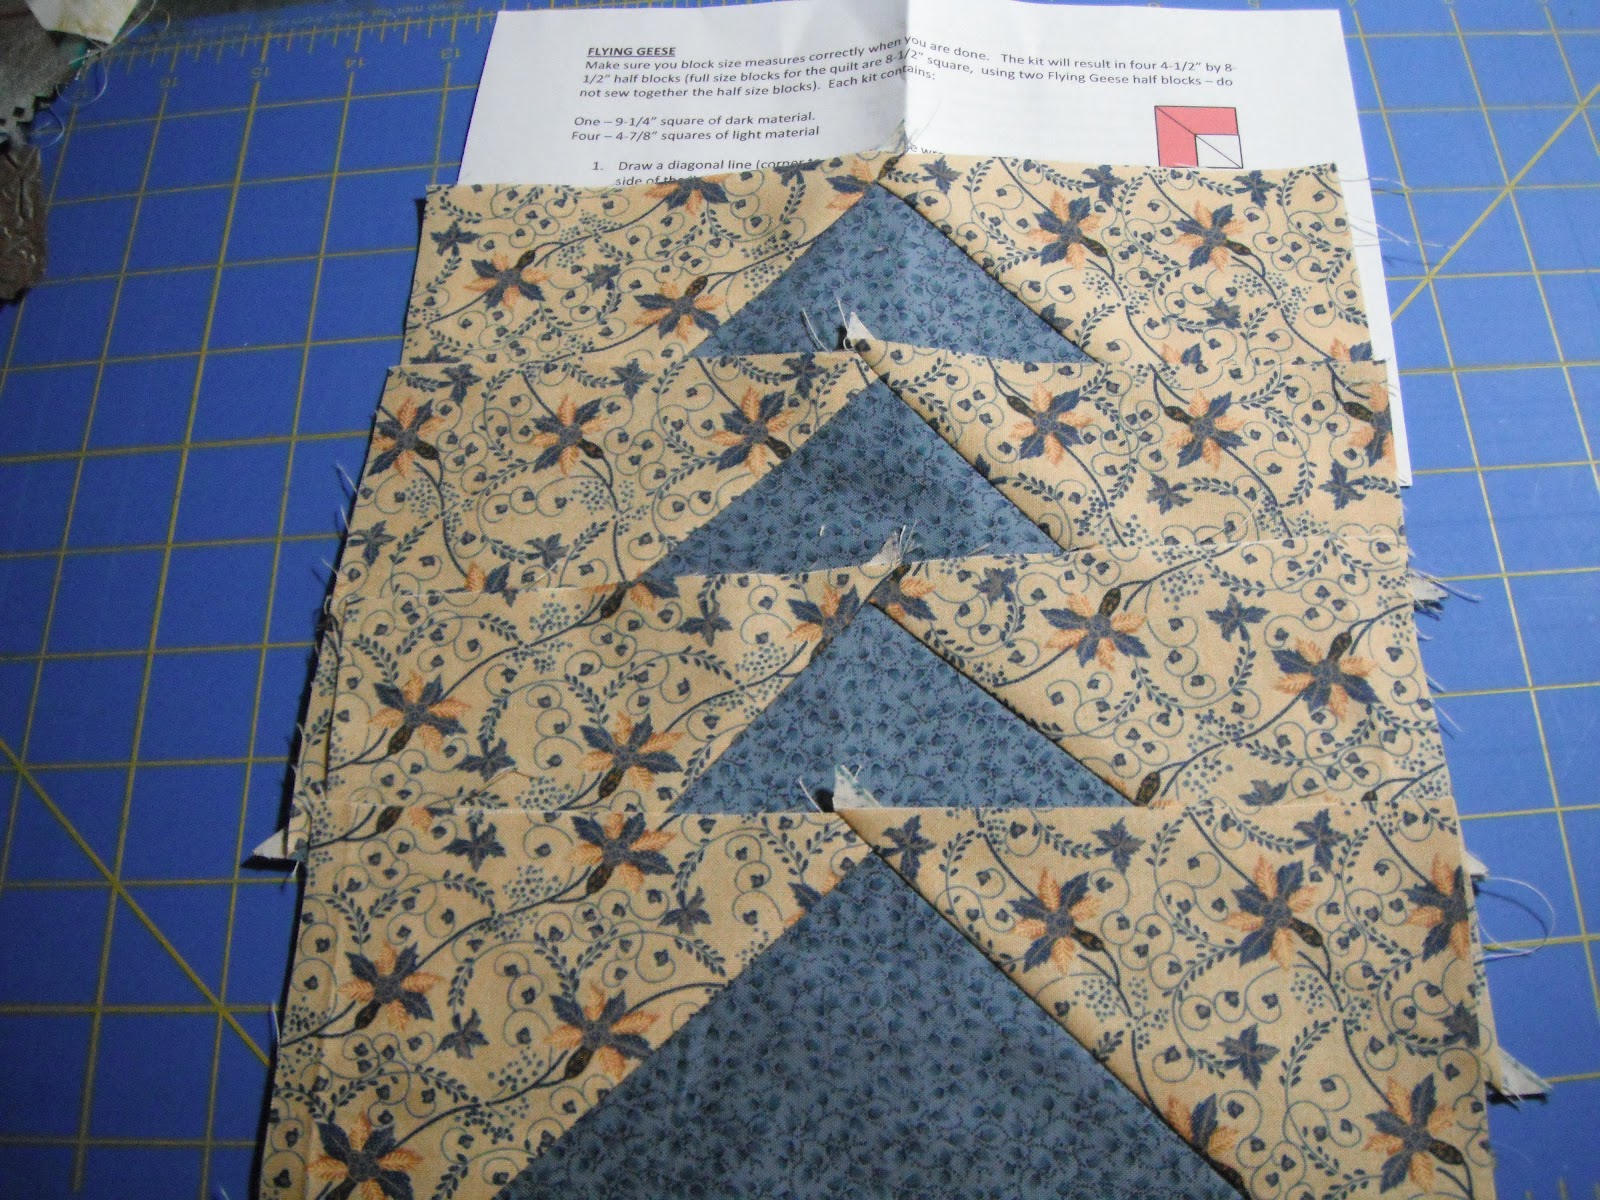
Flying Geese for Charity Auction Quilt - the guild I belong to makes a quilt together each year which is then raffled off and the proceeds go to a local charity.  Well, the 2012 quilt was already made prior to my coming to the guild, but I did get to make a few flying geese for next years quilt!!  Pretty awesome!
 
 
--NEW--
 
{At Sunrise}: Confetti Quilt
I have started a new confetti style quilt that will be of the sunrise I see during the winter from my sewing table.  It doesn't have much form yet, but I am loving playing with all those bits of scrappy fabric... and it's the perfect way to clean up and repurpose all those scraps from my whirlwind of projects lately!
 
Here's a little glimpse... I'm sure I'll do a full post on it soon!
 
 
--IN PROGRESS--
 
Name Game Swap -- due by 15 March
I have assembled the background and ready to take the next steps with this one.
 
--ON PAUSE--  Spinning Starlets {English Paper Piecing} -- a.k.a. I've reached a new level of crazy!
I will pick this up again once my quilt show pieces are d-o-n-e; only 6 weeks to go!  Following along with the Block Party at Selfsewn; creating Rose Stars.  You can read about my overall experience with English Paper Piecing!
 
Laughing Leaves with Frieda Anderson
More of the project can be seen here.  Can't wait to roll up my sleeves and dig back in!  You can also check out what I learned about using fusible in an art quilt!
Still no deadline for this one.  The way things are going, maybe I pick this up once my show pieces are done?

WIP Wednesday at Freshly Pieced

This Week's Work in Progress (WiP) Stats:
Last WiP Wednesday Total: 6
New Projects: 2
Finished Projects: 3 (Last Dance, private swap, and flying geese)
Total WiP's: 5
 
And it seems weird not to have a picture of the pups. 
All that walking path and they have to share the same inch of dirt and sniff the same smell. 
Ahh Sisters! (not related by blood, but in every other way)
 

12.15.2011

Shadow and Timber at the Park {done}

Presenting to you... Shadow and Timber at the Park!  These adorable labs are having a fabulous play date at the park with their lunch and frisbee.  Adorable, no?


I am so happy with how this piece turned out!!  You can see it's beginnings here.


I love the addition of the picnic basket and quilt.  And the multi colored french knots field of flowers.


A close up of the puppy faces, noses, ears, and smiles!!


Sometimes a piece takes a little longer than expected...


...but when it finally comes out .... it's love at first sight!

xxxxxxxxxxxxxxxxxxxxxxxxxxxxxxxxxxxxxxxxxxxxxxxxxxxxxxxx

I hope you are experiencing your own finishing moments as we are all frantically wrapping up creative things before the stroke of midnight on Christmas eve.  Only two more quilts to go... wish me luck!

11.19.2011

Friday Night Sewing {results}

Had a great night sewing and made a lot more progress on the NY-NY binding -- almost done, cleaned off my desk and workspace nicely, loaded a few bobbins, watched the movie 300, and made some serious progress on this confetti quilting piece of Shadow and Timber.

Here is Shadow and Timber in progress...

The confetti was laid out to create the grass and sky.


A close up of all the tiny scraps.


The meshing is overlaid and then pinned down.


Start to sew and secure the pieces in place as you go.


A look as some of the colors that are going in.


Most of the pieces are secured and textured at this point.


I start pulling fabrics for the details of the dogs, red frisbee, trees in the background, and picnic blanket.  I also cut out the pups Shadow and Timber from a print out to get a template for their bodies.


Shadow was cut out of black fabric and Timber out of white.  I still have the paper templates laid on top and everything is pinned in place to get a feel for the placements.


And a close up view.  


I'm really excited with how this piece is turning out!  I still need to sew all the pieces in place, finish planning the trees and sky, decide if I like how the picnic blanket is rumpled, make a picnic basket and then it's off to finishing details like the dogs eyes and nose, the dogs collars, and maybe some flowers.

Hope your sew-in was a huge success!! 


Handmade by Heidi

Can't wait to peak around and see what everyone else did.  You can see the other participants here!
Related Posts with Thumbnails