Showing posts with label batting. Show all posts

10.24.2011

Dog Path in the Woods {completed}

I am going to say welcome back.. to me.  I've been off squeezing every last fun moment out of life.  And that means that blogging took a back seat.  But, I have a camera full of pictures and so much to tell you about.

Let's start the week with a finish, shall we?

{Part I of Confetti Quilting Dog Path}
{Dog Path quick update!}

Here is Dog Path in the Woods bound and ready for hanging!


When I last left off I had a lot of small details to add.  The piece needed to be squared (I decided on an 8.5 x 11 size) and then bound.


Here are the pups up close.  Katie is leading the way with her golden coat and fluffy tail.   Sammy is close on her heels.  I used a bit of batting to create the dogs and teased it to give it more fur-like texture.

Want to pet them?


I added a tiny bit of dark green wool to the trees in the background.  Love how they create a canopy of leaves!


The forest floor wasn't complete without details of hand cut ferns in several greens.  I free motion sewed them on with a multi-green thread.  I also like how they add a bit of dimension to the piece!


And there you have it.  These woods were made for walking, and walking is what they are gonna do!!

As a side note... I went to my quilting guild this past week and brought this piece for show and tell to the Art Quilt Group and as I was describing the technique and how I found it on YouTube..... the ladies dropped a bomb....

They told me that fiber artist Noriko Endo was actually a member of the guild at one point.  My mouth dropped to the floor.

Mor-ti-fied!!  Seriously, my cheeks flushed, my knees felt like they were going to buckle.   I felt unworthy.  Here I was standing in the very same room where Noriko began to really come into her own style and I'm trying to describe her technique.


But, the group was so beautiful about encouraging me and asking me to continue my description.  And get this.... they asked me.  ME?  To give a demo of the technique at the December meeting.  I'm so lucky to have found such an amazing group of artists/ladies to share my love of fabric with!!  I feel like giving each on of them a huge hug!


And with that... I can see a few more of these in my future.  And, the comment I have gotten over and over?  That I should make a bigger one.  So, yes, the next one is going to be much larger!!


Celebrate Color


And I think this project is a perfect candidate for Stitched in Color's Celebrate Color celebration!!

Fall is an amazing time to get out into the woods for a hike!

In the early fall, the temperatures are starting to get cooler and the leaves look like this scene.  Still mostly green, but a few start to carpet the ground making that awesome crunching sound as you bound along and take in the adventure!  As the fall progresses the trees start to light up in soft yellows, bright orange and reds.

Yes, I think you should go take a hike!!

edit to add :: This project was featured at Rhinestone Beagle!!  Thank you Anita and Kelly!

Rhinestone Beagle


I'm linking up with these fun parties!!  See you there!


SUNDAY MONDAY Making TUESDAY Fresh Poppy Design homework Photobucket WEDNESDAY Link up you latest project every Wednesday on the Elle Belle Creative Your Way Wednesday link party! THURSDAY Suzy's Artsy Craftsy Sitcom Rhinestone Beagle FRIDAY 504 Main >

1.10.2011

I've Gone Martha -- don't judge.

Yes, as in Martha Stewart.  Really it's all Greenbean's fault since I saw the idea there first and she made it sound so darn easy (link to Martha's version)!  And it was!

[A tease for You Can Sew-a-thon at the end of this post!!!]

I also can't usually resist a reason to use a mason jar and fabric together.  Plus, I had a tiny tray I am using to organize all this and needless to say the stuff is outgrowing the tray.  So here goes...


I started with a very pretty small mouth mason jar.  I like this one for the size and design, but the nice thing is that the lid created by this project can be put on any other small mouth jar... so if I want to switch to a shorter jar in the future it's as easy as twisting the cap onto a shorter jar. 


Next, I traced the lid on cardboard (inserts from a beer case) and cut out the circle which left me with the results below. 

The hardest part of this project was picking out what fabric to use.  Uhhh, I agonized.  Seriously, spent way to much brain power, but in my defense we are still up to our eye balls in house DIY for the new breakfast bar/kitchen pass through and re-painting more than 1/2 the house.... my brain has been on reduced power from it all.

I landed on this pretty red flowered fabric which had those cutie patootie caterpillars on it that I showed you here... deciding that the small print would be best appreciated on the small cushion.


Then I went a little crazy with the batting.  I save every last scrap of batting, so pulled out a bunch of pieces and decided I wanted a very fluffy cushion.

I cut the batting in squares and then even rounded the corners a bit. 

Are you reading this thinking how is that all going to fit in the limited space in that tiny ring?... if not, then you are like me... I was so optimistic that I would have the fluffiest pin cushion, only to realize after a large amount of hot glue was in place that this wasn't all fitting.  Go me!

I think one or two layers are plenty to fill in the limited space in the ring.  You have to remember to leave room to still screw on the cover (doy! I really have no idea how I let the batting take over my brain during this part, ha!)
Once I came to grips with my space vs. batting wants I ended up with a very nice looking cushion!  It is as easy as Martha says.  Secure fabric to top of ring with hot glue, then put cardboard on the bottom and wrap the fabric on to the cardboard and secure with more hot glue.

Or, my version... I used the cardboard to wedge the fabric and batting into place above the first inner ring mark, then I just a used a tiny dob of hot glue to hold the fabric down on the corners.  Voila!

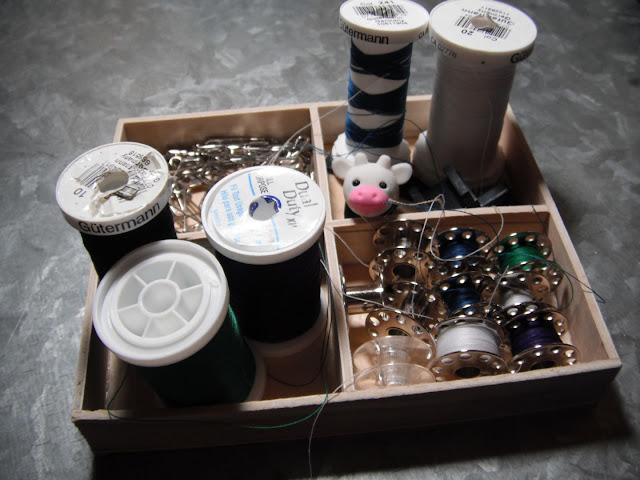
I was able to put my random sewing machine parts ('left over' from when I took it apart here), extra feet for free motion quilting and zippering, and my spare sewing machine needles in the mason jar. 

I don't use this stuff a ton, but it's nice to have it within arms reach when I am setting up for each sewing session.


So, now my little wooden tray is feeling way more organized!  Bobbins, safety pins, and thread all have their own separate cubical. 

And, I am already enjoying my new pin cushion!  The height works nicely, I like how the pins can't get lost in the stuffing, and the little red flowers bring a smile to my face!


What have you made lately that has made you smile bit?  Or what project have you dropped everything for in order to bring a bit more organization to your creative space?

You Sew Can-a-thon
And! I have been stewing a bit and will have details for a fun You Sew Can-a-thon coming on Wednesday!  Are you as excited as I am to make a cute hand/machine sewn something or other for say Valentines Day or an upcoming birthday? 

I am!!

11.30.2010

Plaidly Pocket Quilt Finished!

I shared yesterday that I finished the plaid quilt I was working on!

It's marvelous!


Here are some of the finishing photos and the real unveiling!  When I last shared here, I was still in need of binding.

I decided on continuing the scrappy theme into the binding.  Also, remember that blue stars fabric?  It finally made it's appearance with some of the other fabrics I was working with for the top.

Yes, Katie continued her quality checks throughout the process.  Here you can see the quilt laid out with the loose binding cut out and laid on top.  Katie looks smitten, doesn't she?

I did have to cut a bit all the way around to square up the quilt.  Yes, it moved.  It always moves, doesn't it?  I have a neat idea on ways to use those small pieces of batting and fleece -- I'll have to show you soon!


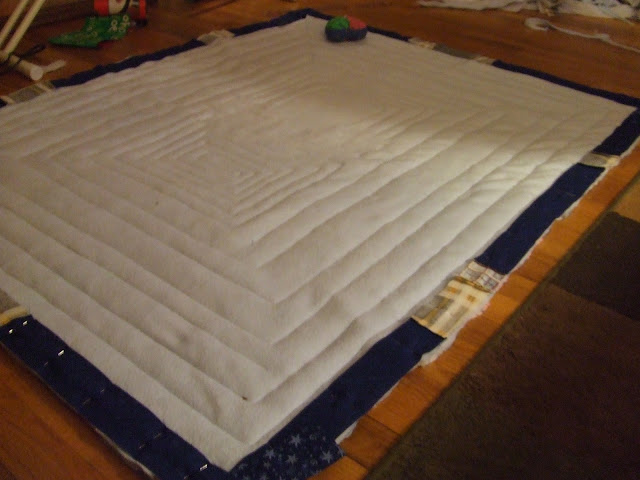
This photo gives you a better look at the quilting pattern I went with.  And the binding is pinned and ready for sewing!


Sewing up the binding is always so nerve wrecking.  But, I didn't break any more needles and the binding went fairly smoothly!


Fast forward to the next morning and I was ready step back and take it all in!  So purdy!  I really like how the design turned out and that pocket totally rocks my socks!! 

Oh, and don't you like that little pop of royal blue from the binding?


Here is a close up of the flannel.  This is really one quilt that is meant to be touched before you can say you have really experienced it.  It feels so darn soft!!


A quick peak of the soft blue-gray fleece used for the backing.


This was certainly one photogenic and adorable lap quilt!  So, you may still be wondering who I made this quilt for.  I told you it was for a guy.  Any guesses?

The answer... this past Friday I gifted this quilt to my lovely step-father.  He is still healing and regaining strength from an operation last year and he mentioned that he is cold a lot -- especially this time of year.  That's what got my juices flowing.  Maybe a nice warm quilt to snuggle with would keep him warm like a nice big hug.

When I gave it to him, I kind of just plopped a folded up bundle into his arms and told him I made it for him.  He grinned, I grinned, Mom grinned, bro grinned, bro's fiancee grinned. 


Dad unfolded it and said it was really nice.  I told everyone they had to touch it -- it's so soft!!  Dad draped it on his lap and I think little tears were forming in the corner of my eyes. 


It's really touching to see him so surprised and happy!  That moment is what I focused on with each stitch I put into the fabric.  That is the moment I will remember for what I am sure will be a long long time!

I will also be sharing this at Amylouwho's Sew and Tell!  You can see other fabulous sewing projects finished this week here.
Related Posts with Thumbnails