1.12.2011

You Can Sew-a-thon Announcement

Remember how I was telling you that I have seen a bunch of comments about how my adventures might be inspiring you to pick up a needle and thread or dust off your sewing machine -- well, I'm all about that -- and binga-boom the creation of  You Can Sew-a-thon!!

These little guys are erasers; I couldn't resist their cuteness factor.  The giraffe lives on my pencil and the cow lives in my little notions box that I showed you here.  You can often find a bit of whimsy in my work area!
What is You Can Sew-a-thon!! ??

This adventure will be designed to build confidence in a new sewist, kindle or rekindle the love of sewing, brush up sewing skills, and even encourage you to create a nice handmade something that can be given as a gift!  Are you game?
How will it work??
I am still working out some of these details out, but I think we will pick 1-3 projects a month.  I will create the projects with lots of photos and thoughts along my creation process.  I may even show you ways I modify or give some things my own twist.  Then you give it a try and ask me and the other Sewists a ton of questions!  At the end of the month we will share our successes (and not so successes; hey we all have them) as they will all count as entries to an uber cool You Can Sew-a-thon prize pack!  -- think fabric, sewing notions, cute inspirational items, something handmade, and maybe even some chocolate!!
Tell me more?
I'd like us to take this week to pick out a few things that might be fun to start with and have you vote to decide what we do first -- maybe something cutsie for Valentines Day? 
So, your homework (if you are interested) is to look through the list below and pick out what you like or add new suggestions.   Let's meet back next Wednesday as I reveal what project we will start with and announce creation time lines.

Current list of ideas.... what do you think?
  1. pin cushion (example tutorial from Happy Together)
  2. apron (example tutorial from Stop Staring... and Start Sewing)
  3. pillowcase  (example tutorial from Film in The Fridge)
  4. snack baggie (example from I Have to Say)
  5. luggage tag (example from Rudy and the Dodo)
  6. dog bandanna (example tutorial from Love to Sew)
I have a feeling this sew-a-thon will span the whole year.... this means you can jump in when you see a project you like or progressively try things that may seem impossible, or come back to a project when you need a gift or a have a few free moments.  

I also thought if you are a sewing tutorial creator... then you could leave a link to your simple/fun/creative sewing tutorial in the linky tool and we just may select your tutorial to work from (the linky will be open till the end of the month!!  Any sewing projects welcome!

Alright, that's what I have so far.  I'm excited to give this a go and even try new things myself!  Can't wait to hear what you think, see your tutorials and suggestions, and then off to the fun part -- playing with fabric!!

1.11.2011

Tulip Table Runner or is it a Table Square?

She's done!  Ready to be admired for all her beauty. 

As we are expecting anywhere from 10 to 18 inches of snow in the next 24 hours this is a welcome breath of the spring to come and a good way to combat the winter blahs!  I have showed you progress here and here.

I give you Tulip Table runner -- or Table square?  What do you call a table runner that goes on a round table?

A closer look at the free motion quilting that I am learning to live for!  Gives that "loop, swoop, and pull" saying (to teach kids how to tie their shoe laces) a whole new quilting meaning. 

I find myself saying the phrase or mantra over and over as I free motion.  It becomes a sort of rhythm -- a meditation. 

Next up was the binding.  I had the binding picked out from the start and it turned out even more fantastic than it was in my head. 


I can see improvement in my binding each time I go through it, but I have a lot of room to improve in this area!

And here is the first look.  The corner is flipped up to show the back and front at the same time.

Oh yes, this sceams April showers bring May flowers!! 

I have a wonderful assortment of tulip bulbs in the ground patiently waiting to bloom.  I really enjoy watching them grow and then pop full of color (as long as the deer, woodchuck, rabbits, dog don't get them first)

And a quick look at the back.  This could potentially be considered double sided if you wouldn't mind the brown.  I actually quite like the look of the pin wheels!!  The whole thing is so playful!

Yes, there are many variations that could be dreamt up for this.  I am already planning another one and might instead use a single color for each tulip.   Also, this next one will in fact be a runner instead of a square.  Can't wait to see what my crazy spirit whips up in the next design!


These tulips are already happily adjusting to their new home with my amazing neighbor -- yes, the one that makes us homemade meatballs and extra sauce and always has a dog biscuit and carrot on hand when Katie visits.

Have I mentioned how lucky I am today?

1.10.2011

Straight from the Design Wall

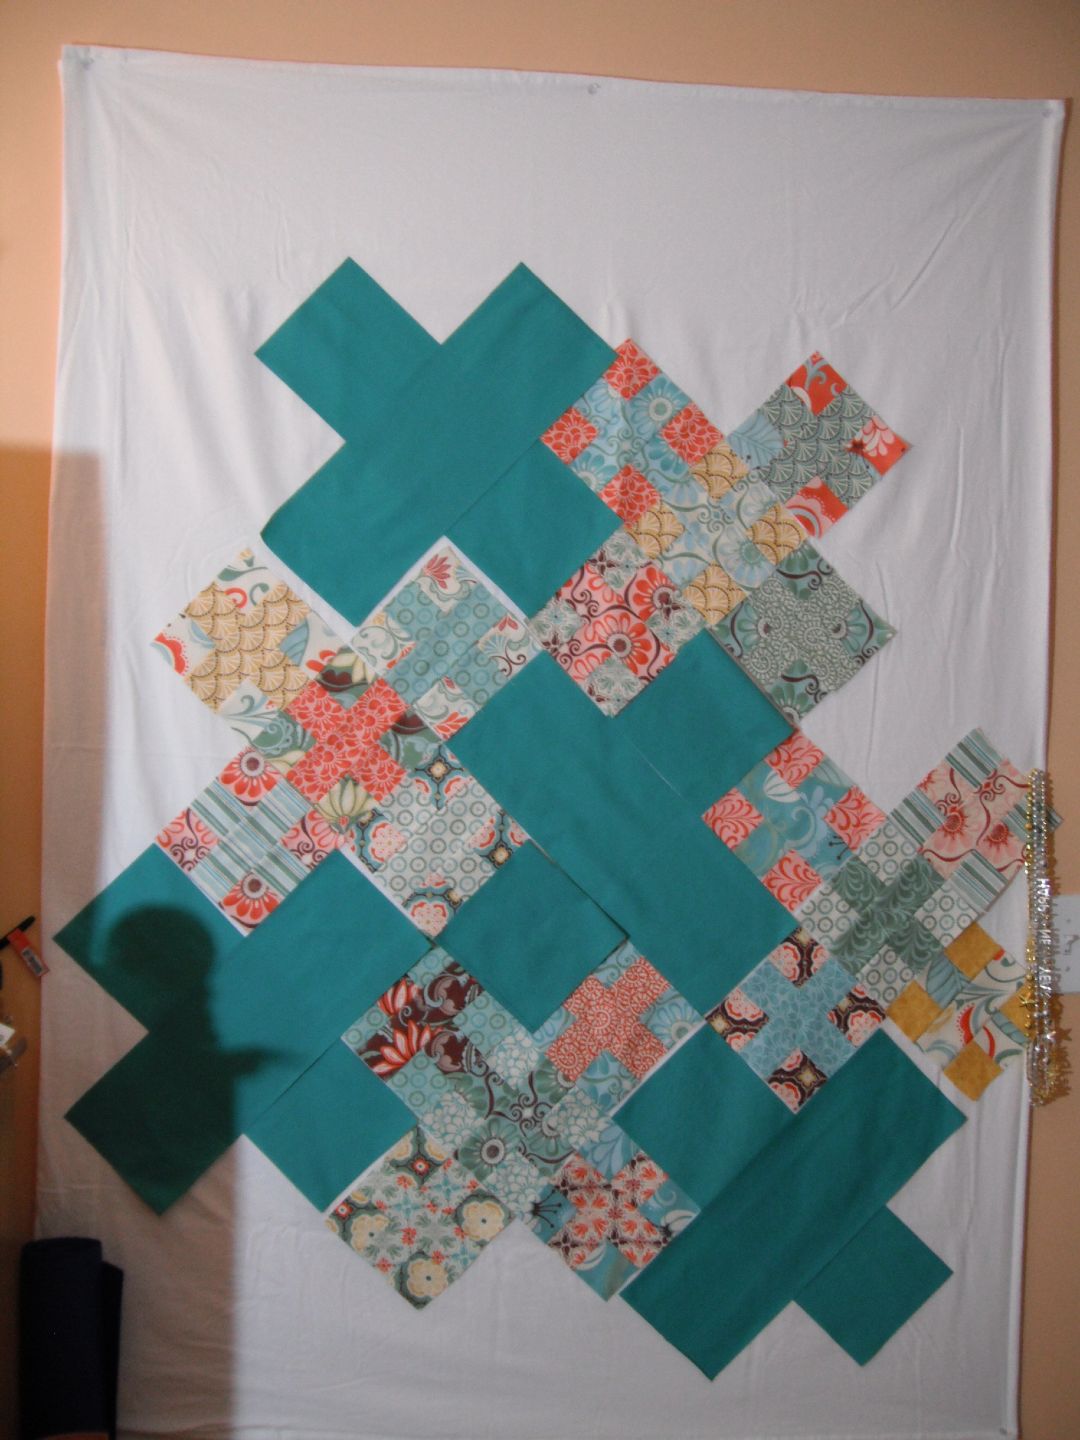
Things are brewing over here.  Happily brewing into a criss-crossy loveliness!

Here's the re-arrangement on my design wall...


What do you think?  

I am still contemplating whether or not this is too much solid all at once... and at the same time I am tempted to bring in another solid. 

Still not really sure where this will all land, but I am so enjoying these quiet moments while the brewing happens.  Silly tv show on, dog at my feet, natural light bulb keeping the winter blues at bay.

I've Gone Martha -- don't judge.

Yes, as in Martha Stewart.  Really it's all Greenbean's fault since I saw the idea there first and she made it sound so darn easy (link to Martha's version)!  And it was!

[A tease for You Can Sew-a-thon at the end of this post!!!]

I also can't usually resist a reason to use a mason jar and fabric together.  Plus, I had a tiny tray I am using to organize all this and needless to say the stuff is outgrowing the tray.  So here goes...


I started with a very pretty small mouth mason jar.  I like this one for the size and design, but the nice thing is that the lid created by this project can be put on any other small mouth jar... so if I want to switch to a shorter jar in the future it's as easy as twisting the cap onto a shorter jar. 


Next, I traced the lid on cardboard (inserts from a beer case) and cut out the circle which left me with the results below. 

The hardest part of this project was picking out what fabric to use.  Uhhh, I agonized.  Seriously, spent way to much brain power, but in my defense we are still up to our eye balls in house DIY for the new breakfast bar/kitchen pass through and re-painting more than 1/2 the house.... my brain has been on reduced power from it all.

I landed on this pretty red flowered fabric which had those cutie patootie caterpillars on it that I showed you here... deciding that the small print would be best appreciated on the small cushion.


Then I went a little crazy with the batting.  I save every last scrap of batting, so pulled out a bunch of pieces and decided I wanted a very fluffy cushion.

I cut the batting in squares and then even rounded the corners a bit. 

Are you reading this thinking how is that all going to fit in the limited space in that tiny ring?... if not, then you are like me... I was so optimistic that I would have the fluffiest pin cushion, only to realize after a large amount of hot glue was in place that this wasn't all fitting.  Go me!

I think one or two layers are plenty to fill in the limited space in the ring.  You have to remember to leave room to still screw on the cover (doy! I really have no idea how I let the batting take over my brain during this part, ha!)
Once I came to grips with my space vs. batting wants I ended up with a very nice looking cushion!  It is as easy as Martha says.  Secure fabric to top of ring with hot glue, then put cardboard on the bottom and wrap the fabric on to the cardboard and secure with more hot glue.

Or, my version... I used the cardboard to wedge the fabric and batting into place above the first inner ring mark, then I just a used a tiny dob of hot glue to hold the fabric down on the corners.  Voila!

I was able to put my random sewing machine parts ('left over' from when I took it apart here), extra feet for free motion quilting and zippering, and my spare sewing machine needles in the mason jar. 

I don't use this stuff a ton, but it's nice to have it within arms reach when I am setting up for each sewing session.


So, now my little wooden tray is feeling way more organized!  Bobbins, safety pins, and thread all have their own separate cubical. 

And, I am already enjoying my new pin cushion!  The height works nicely, I like how the pins can't get lost in the stuffing, and the little red flowers bring a smile to my face!


What have you made lately that has made you smile bit?  Or what project have you dropped everything for in order to bring a bit more organization to your creative space?

You Sew Can-a-thon
And! I have been stewing a bit and will have details for a fun You Sew Can-a-thon coming on Wednesday!  Are you as excited as I am to make a cute hand/machine sewn something or other for say Valentines Day or an upcoming birthday? 

I am!!

1.08.2011

It's Oh So Snowy/Busy

Lots to do around the happy house today, but I couldn't help a pause to show you how snowy and dreamy it looks to Katie's delight!


We got to play snowballs last night which is always a lot of fun with barking, running, plopping in the snow, and all that other stuff that comes with cold weather fun!  If you can't beat it... embrace it!


The wood stove is roaring and we have lots of indoor work to do on the breakfast bar I showed you at the beginning of the week here.  The project has also expanded a bit to include fixing, spackling, and repainting the whole area ceiling and walls.

I also hope to delve into some tidying of the sewing room which should lead to finishing the tulips project I showed here, and I'd really like to cut more pieces for the X quilt!  Oh, and some new fabrics arrived this week that I can't wait to play with! 

Here's a sneak of one of the charm's pack I now have on my desk.  (yes I said one of... as in there may be a few more)  I already can't say enough about how 'me' Central Park is.  It's bright, cheerful, playful, and has such an innocence to it.  I'm torn on how it will be used, but I can't see making a bad thing from it!


Yes, we are keeping very busy, but honestly, that's just the way I like it!  A busy mind and body is a happy mind and body.  And there is nothing like standing back to admire the work you created with your own hands and determination. 

Lot's of love to you and looking forward to catching up with you on Monday!!

1.07.2011

Happy Moment #12: Measured in Spackle Dust

A Friday ritual with Soulemama.  A single photo - no words - capturing a moment from the week.  A simple, special, extraordinary, happy moment.  A moment I want to pause, savor and remember. 

If you're inspired to do the same, leave a link to your 'moment' in the comments too!


“Be happy for this moment. This moment is your life.”
~Omar Khayyam

1.06.2011

Katie Dog Days

Yes, it's been a long day... and this post is so much later than normal.  Nice to finally be winding down for the day!

I have been wanting to start this for some time now and today seems as good as any to give it a go.  I'm hoping it will become a feature post once a week that centers around all things Katie!  You saw this coming didn't you?

Yup, we all love her dearly (of course I'm really biased) and I hope you agree that she deserves, or demands rather, her own day!

We had a recent romp in the snow that had me laughing so hard my sides hurt.

Here is what some of the snaps looked like.

Regal. silent. serious. golden.


Sniffing. curious. smart. golden.


Ridiculous. hilarious. pee in your pants funny puppy that is the light of my life.  my happiness!


So, what do you think?  More Katie videos?  For me it's a sneaky way to remember to use my camera (which has a nice video feature) to capture those goofy goldy moments that make us laugh and smile so much.

Hope you had a wonderful day and have a relaxing evening!

1.05.2011

Tulips are in Bloom!

I have begun quilting my tulip table square and am so excited with how it's coming along! 

I am doing a really random loopy-doopy quilting (very technical quilting name) in light pink on the top (beige on the bottom) and enjoying the freedom of free motion quilting.  I can see that my circles are getting more round, I'm taking more chances making up the design as I go, and I'm getting better at not getting myself stuck in a corner, ha!

Here's a sneak peak.


The texture is so amazing!  I really like how it feels on my fingers and the visual puffs and valleys created by the quilting are neat too!


Yes, I had the whole thing quilted when I flipped it over and found a fold on the backside which lead me to rip out nearly 1/2 of the quilting -- if you follow me on twitter, then you have already heard all about it.  That's what I get for trying to quilt too late in to the night.  Darn fold!

This will get a quick straightening/ironing and then I should be able to finish the quilting and attach the binding!

As for my X Marks the Spot quilt, I haven't made any more progress, but I did get to show my MIL what I have done so far (she is the one who gave me the gift card which purchased the fabric).  It was fun to show her and talk about where I want to take the quilt.  It's even more special because she 'gets' my excitement!

I did however, take advantage of a great sale and picked up a while flannel sheet.

Why you ask?

To make one of these!  I have seen so many of these design walls and decided it's exactly what I need to let this quilt marinade in my head properly.  I am using a twin size flannel sheet and right now it is folded in half.  I'm not sure if I have a place to spread it out any more, but I still already appreciate the stick and play ability. 

And no joke, within 1 hour of having this 'design wall' up I had laid out a few blocks and formed these larger X's and already I have more spark behind where I think I am going to take this.  Now, I just need a few quiet minutes to make it happen.  Can't wait!

Hope your projects are humming along nicely and you are getting a great start to the new year!


Work in Progress (WIP) StatsLast WIP Wednesday Total: 2
New Projects: 0 (although I have two bouncing around in my head)
Finished Projects: 0
Total WIP's: 2

---Linking to W.I.P. Wednesday---

1.04.2011

Creative Tuesday: New Year

Do you feel that?  Take a nice big breath in slowly and let it out even slower.  Yes, it's time for  Mr. Toast's Creative Tuesday'sOh, how I have missed you!

Mr. Toast, I hope you had the most amazing holiday season, love!  Thank you for all you do to host this community and give me this reason to connect with my creative side and sketch pad.  I'm not sure I would do it without your gentle nudge.

Today's theme... New Year.  Also known as (for me)... open slate.

I did my best to clear my mind and just let that wonderful open-clean slate wash over me and exit through the watercolor pencils.

 
All that hope, promise, dreams, determination, and confidence on what can be.  And what will be!

I've very proud of this one!  Feels like a great start to the year... a great sign of what's to come... a chance that this could be a great year for stretching and strengthening creative muscles!

Who's with me!?!!

And in keeping with my normal show of process... here is what my desk looked like toward the end of the drawing.

 
It's just not a proper doodle for me unless I make a big fuss (mess) all over!  And yes, it's important to dump all the pencils out of the box in order to be sure you find just the right shade of green *wink*

This is going to be a fun year! 

Other artists in the community and more information about joining in can be found here.

1.03.2011

Tear Down to Ring in 2011

New Years Eve in the happy house...

...you are probably thinking of parties or snuggling in with a movie, right?

Well, this year was a bit different.  We took down a wall.  Well, to be more exact we cut a hole in a wall.  A rather big hole.  A hole that allows so much amazing light into our once dark kitchen.  It's really a great hole.

Here's how the whole thing went down... (ha! get it!!)

This is the wall we targeted.  Can you hear the eerie music in the background... *dun dun dun -- dun dun dun*

We removed the very large mirror that was here when we bought the house.


Covered everything -- tree included -- with plastic sheets.


Made a humungo mess as Mr. Happy cut out the hole on the dining room side with a circular saw.  Dust was flying, it was noisy... it was exhilarating! 


A tiny hole was made on the kitchen side.  Just look at all the light pouring in!  We can see the light!


Another big mess as the kitchen hole was cut.  Tons more dust flying!  No turning back now.


And here are the first results!  We can actually eat breakfast in the kitchen now without turning on the lights.  It's really a remarkable difference!


We have a lot more finishing to do.  But since this picture, the studs were cut, the edges were sheet rocked and metal edges installed, the first two coats of joint compound are on and ready to be sanded.

We are also ordering the counter top for the breakfast bar this week.  I would like to get a nice thick piece of wood to put there.  It's going to be so awesome when it's all put back together!  I will be sure to keep you updated on the progress we, well, make progress!

I just love the Mr's vision of what he wants to do with the house -- he's spot on and I am one lucky girl!

---Linking to Midweek Blues and All About You Monday's and Fab Friday---
Related Posts with Thumbnails